Showing posts with label food. Show all posts

Tuesday, October 22, 2013

Fruit and Veggie Smoothie


My oldest daughter is just getting over strep throat and my husband and I have been doing the best we can to stay healthy.  I mentioned the other day that we really try to boost our fruit and vegetable intake when we are fighting off a bug.  I've also been reading Eat to Live by Joel Fuhrman, and it has really been making me think that I need to do even more to increase my leafy green vegetable intake.  Fuhrman ranks foods using a scoring system he devised called ANDI (aggregate nutritional density index), running from a low of 1 to a perfect score of 1000.  He looks at both the amount of nutrients a food has as well as the amount of calories in that food.  Guess which food scores a perfect 1000?  Kale.  Spinach has a high score of 707, while foods like cola and fries score only 1 and 12 respectively.  A fact that has been in my head as I plan meals this week:  Fuhrman suggests that every person should be eating about one pound of raw vegetables and one pound of cooked vegetables each day.  As I increase my veggie intake (nowhere near two pounds daily), I notice that I don't have room for other stuff that is less nutrient dense.

We juice fruits and vegetables occasionally, but I really like to make this fruit and veggie smoothie to boost my intake.  I prefer it over the juice because it retains all of the fibre from the produce and fills me up.  When I have a smoothie, I usually have it for breakfast.  My husband prefers a smoothie as an evening snack. The key to this smoothie is the banana.  You MUST use a banana or you will taste the spinach or kale. The spinach offers a smoother consistency and you will really not taste it at all.  It is a good place to start with a veggie smoothie.  Once you have tried the spinach, I really suggest you try the kale!  It requires more blending and makes for a slightly rougher texture.  You will taste a bit of "green" flavour, but my daughter has been drinking these smoothies since she was a toddler and has never turned her nose up at it.  I have an old, cheap blender and it does a fine job on this smoothie.  I'm sure if you had a Blendtec or Vitamix it would be even better!
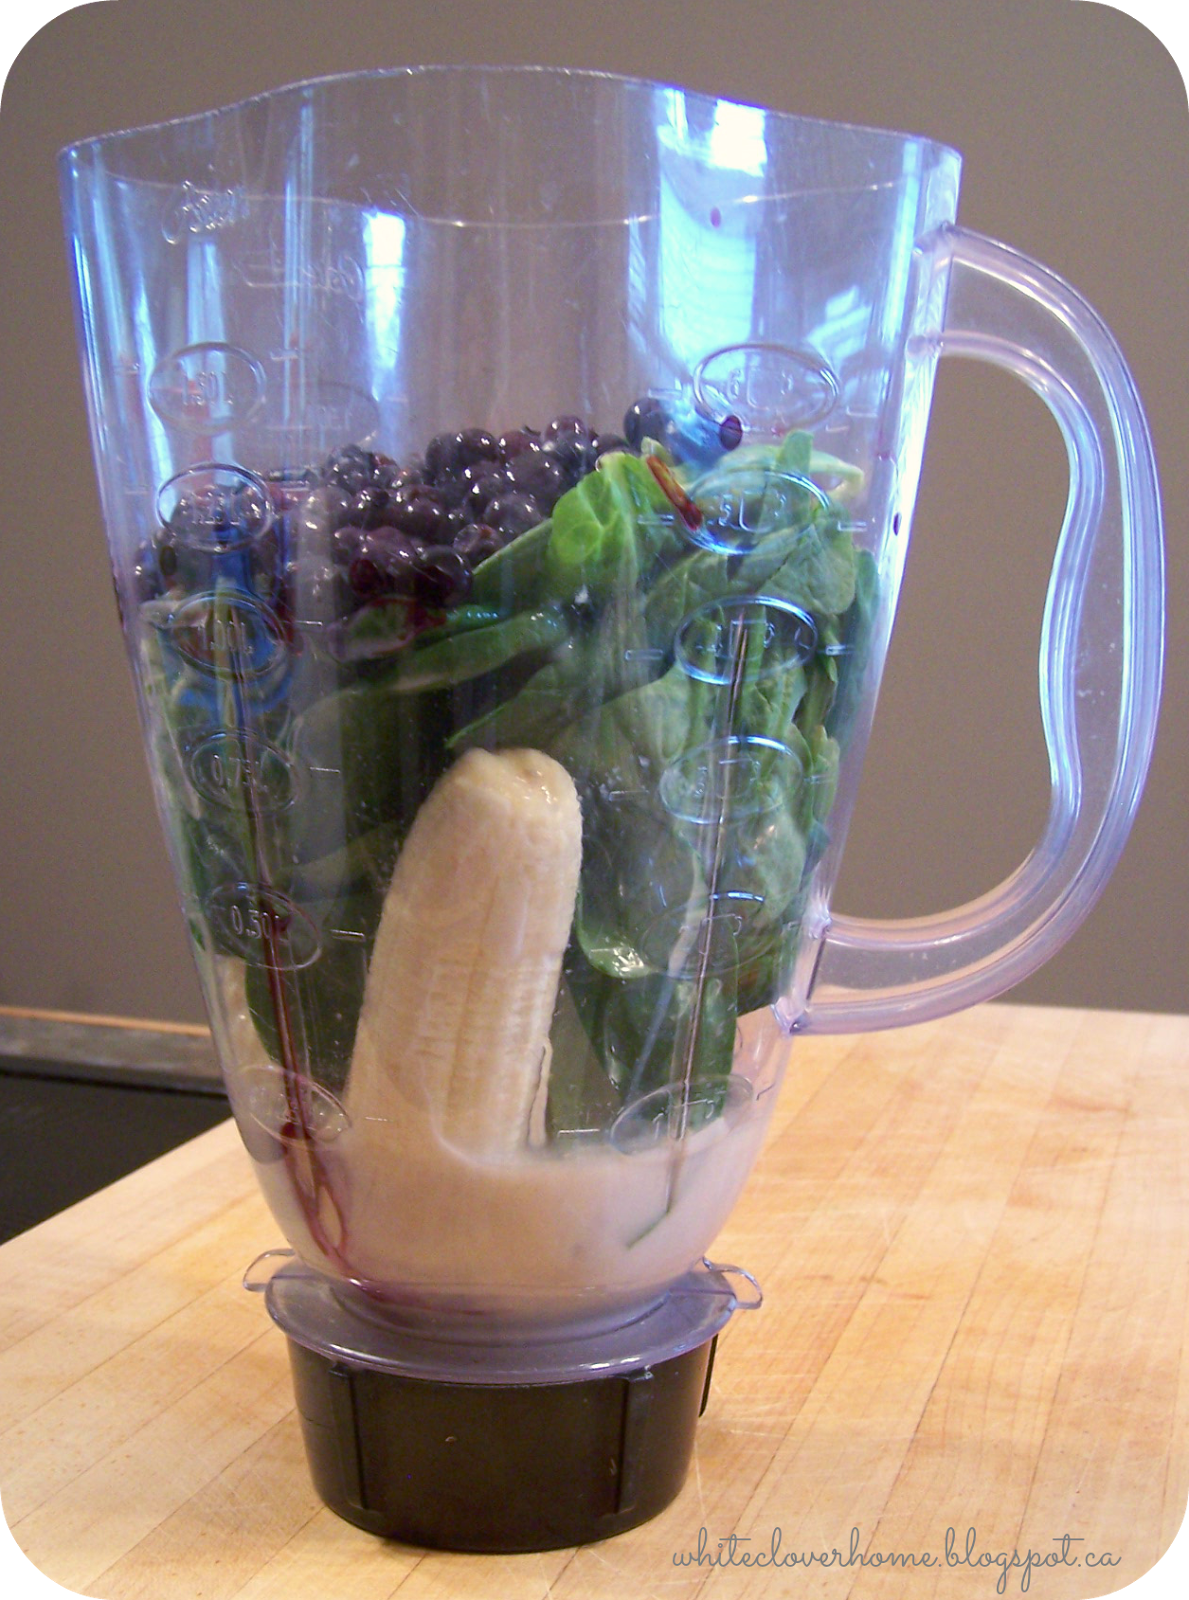

Fruit and Veggie Smoothie

  • one very ripe banana, fresh or frozen
  • a giant handful (about 2 cups loosely packed) of baby spinach, OR 1 cup of loosely packed kale leaves, stems and any tough bits removed
  • 1 to 2 cups of other fruit - fresh or frozen.  If using frozen, I prefer to thaw the fruit partially first to allow more flavour to shine through.  Good choices are any berries, mango, peaches, and kiwi.
  • at least 1/2 cup milk or non-dairy milk
  • other add-ins of your choice.  I always use 2 tablespoons of ground flax, but have also used matcha powder, probiotic powder, and protein powder.  You can also add up to 1 cup of yogurt if you eat dairy.
Place banana in the blender, followed by the spinach and fruit.  Top with your add-ins and pour milk over top.  Blend for ten seconds.  Then you will need to push down on the contents with a spoon and blend again. Add more milk if needed to get things really going.  Once the contents are blending well, blend for another minute or so, especially if you are using kale.  Serves 2 (or one for a huge breakfast if you're me....)

post signature


Shared at:
Sugar Bee Crafts, My Uncommon Slice of Suburbia, A Bowl Full of Lemons, Elizabeth and Co, Not Just a Housewife, Funky Polka Dot Giraffe, New Nostalgia, Homework, A to Zebra Celebrations, Cupcakes and Crinoline, The Breezy Birdie

Sunday, October 20, 2013

Gluten Free and Paleo Banana Muffins


I have always been a baker since I was a teenager.  The first things I remember baking on my own were brownies and pineapple upside down cake from an old, thick cookbook of my mother's.  In my late teens I was on the quest for the perfect chocolate chip cookie recipe, one that was soft and chewy that flattened as it baked.  The quest finally ended with a recipe found in a Canadian Living magazine. It is still the "go to" chocolate chip cookie recipe for my mother and sister.

In my adult years, I baked various kinds of breads and perfected baked cheesecakes with smooth, uncracked tops.  I loved to bake, and rarely bought baked items from the store.  Then, about six years ago, my daughter was diagnosed with Celiac Disease and I had to relearn everything I knew about baking.  All of my "go to" recipes were useless to me.  I tried many gluten free recipes that went straight into the garbage after trying one bite.  Many of these recipes had been published in cookbooks and I had followed the recipe with perfect precision.  I wonder if the cookbook editors even tried the recipes.  After three or four years, I had some decent, new gluten free "go to" recipes.  I knew a lot about gluten free ingredients and different baking techniques.  Still, one limitation of most gluten free recipes was that they went stale very quickly, and had to be frozen within 12 or 18 hours of baking to retain any freshness.  Even then, many items were crumbly once thawed.

Lately, this downfall of gluten free baking has changed for me - mostly thanks to the Paleo food movement. I am interested in Paleo cooking, in that - it's grain free, which is great for our gluten free family - and my husband is very much a carnivore.  So many of the recipes will appeal to him.  (I am mostly a vegetarian, not necessarily for compassionate reasons, but more for the environmental and health benefits.)  Reading Paleo cookbooks introduced me to coconut oil and flour.  These ingredients have helped me to create some pretty amazing muffins that stay fresh and moist - for days on end!

I slowly developed these muffins after making the muffins in Practical Paleo.  While the muffins in Practical Paleo are absolutely amazing, they didn't appeal too much to a child's taste buds.  After a few months of switching this and that, this is what I came up with.


Gluten Free and Paleo Banana Muffins

Makes 12.  Preheat oven to 350 degrees Farenheit.
  • 6 eggs
  • 1/2 cup honey
  • 1/2 teaspoon baking soda
  • 1/4 teaspoon salt
  • 1 teaspoon vanilla
  • 1 teaspoon cinnamon
  • 1/4 cup melted coconut oil
  • 1/2 cup coconut flour, preferably sifted
  • 1 large ripe banana, diced
  • 1/2 cup chocolate chips (optional)

Mix first six ingredients in a bowl.  Whisk well.  Add in melted oil while whisking.  Otherwise the oil may solidify in a chunk within the batter.  Not good.  Add in coconut flour and whisk well until there are no lumps.  Fold in bananas and chocolate chips (if using).  Scoop into a muffin tin lined with muffin papers. Bake for 20 minutes or until an inserted toothpick comes out clean.  Cool on a baking rack.  Once cooled, store up to four days on the counter in a sealed container.  May also be frozen.

You could also try maple syrup or agave syrup in place of the honey, although I have never tried this. To be honest, I never sift the coconut flour, but instead whisk and whisk and whisk until the lumps are gone.  The coconut flour is amazing - after a minute or so, it kind of slurps up all of the liquids, creating a thick batter.  I get mine at Costco (only 7.99 for 2 Kg!) or at Bulk Barn (a bulk food store in Canada).

These muffins don't last long in our house, and I have been baking about three batches a week!

post signature


Shared at:
Three Mango Seeds, Creating My Way to Success, Clairejustine, DIY Home Sweet Home, Be Colorful, Skip to My Lou, An Original Belle, Cherished Handmade Treasures, A Bright and Beautiful Life, Diary of a Real Housewife

Wednesday, October 16, 2013

Cold (and Flu) Fighting Tea


My oldest daughter came down with a cold-like illness this weekend, with a sore throat and three days of fever.  She never gets sick for more than a day, so I think it must be a nasty bug.  We were at the cottage with family for Thanksgiving and she and I had to share a bed.  So I feel as though I am due to get ill at any moment.

There are a few things we do at our house when one of us is sick and the rest are trying to stay healthy.  Of course, we all are extra diligent in washing our hands often.  I wash hand towels and bed linens more often.  We all try to get in extra doses of fruits and veggie with smoothies, juices made in our juicer, and soups.  Something else that my husband and I do is drink our version of a cold fighting tea.  Neither one of us are medical professionals or dietitians, but we feel this helps us beat the germs!


Cold (and Flu) Fighting Tea

1 slice lemon, about 1/2 an inch thick with peel removed
2 slices fresh ginger, about 1/4 inch thick with peel removed
About 1 tablespoon raw, unpasteurized honey
Boiling water

Place ginger and lemon slice in a mug.  Fill mug with boiling water.  Stir gently.  Allow to sit for five minutes. Remove lemon.  Stir in honey.  Drink!


I remove the lemon because I don't like big chunks of lemon in my mouth, but you can keep it in while you drink if that doesn't bother you.  We use raw honey because we feel it has stronger antimicrobial properties, although I know others swear by using any kind of Manuka honey.  Of course, never give this "tea" or honey to a child under one.  

My husband sometimes goes a step further and crushes a garlic clove and mixes it with honey and apple cider vinegar.  He adds a bit of water to thin it and shoots it back.  It's disgusting but he says it helps him feel better.  He also does this hydrogen peroxide trick when he feels something coming on.

Hopefully no one else gets sick, especially the baby.  I've been trying to keep them apart, but it's not always easy!  What do you do when you feel yourself coming down with something?

post signature


Shared at:
Handy Man Crafty Woman, Someday Crafts, The Trendy Treehouse, Creations by Kara, We Like to Learn as We Go, Not Just a Housewife, Elizabeth and Co, Ladybug Blessings, Fireflies and Jellybeans, A Glimpse Inside, A Creative Princess, The Crafty Blog Stalker, Made in a Day, Gingerly Made

Friday, October 4, 2013

Slow Cooker Fall Morning Pumpkin Oatmeal


I recently bought a large bag of organic locally grown rolled oats.  We are trying to spend more of our food dollars locally to support farmers as well as reducing the transportation emissions associated with our food.  Eating locally is not always easy in Canada, unless you live in more southern regions.  Where we live, I am grateful for any and all locally grown foods that I can access.  So although I am accustomed to using quick cooking oats in the kitchen, I decided it was worth it to make these oats work for us.

I know that I could have processed the oats in the food processor for a few seconds to make them "quicker cooking", but I decided to branch out and try out some new ideas.  The first day that I cooked the rolled oats, I was pretty annoyed at how long they took to cook.  Having cooked steel cut oats in the slow cooker before, I thought I would give it a try with my new bag of oats.  Also, since it is fall, I had to put a pumpkin-y twist on my breakfast oatmeal.


Fall Morning Pumpkin Oatmeal

2 large apples, peeled and sliced (about 2 cups)
2 cups pumpkin puree (not pumpkin pie filling)
1 tablespoon pumpkin pie spice or cinnamon
1/4 cup maple syrup (or brown sugar, brown rice syrup, etc.)
1/2 cup raisins
2 cups rolled oats
2 1/2 cups water

Beginning with the apples, layer the first 6 ingredients in the slow cooker.  Pour water over the ingredients.  Do not stir.  Cook on low overnight for 8 to 9 hours.  Serves 6.  Breakfast will be waiting for you when you wake up!

I used my smaller sized slow cooker, and so the ingredients filled it about 3/4 full.  If using a large slow cooker, you may need to reduce cooking times to prevent the edges from becoming too dark or crispy.  Keep leftovers in the refrigerator and microwave before eating.  I found this better the second day!

Shared at:

My Romantic Home, Truly Lovely, Chic on a Showstring, The Better Half, Dear Creatives, The Best Blog Recipes, Diana Rambles, Obsessive and Creative, Simply Sweet Home, Serenity Now, Thirty Handmade Days

Wednesday, October 2, 2013

Weekday Soup


For a few years, we rarely ate soup at our house.  Our oldest daughter had been newly diagnosed with Celiac Disease and we were transitioning to a gluten free diet in our home.  All of the soups that we were used to buying contained gluten, and so they were out of the picture.  I was slowly moving towards making more and more of our foods from scratch, but soup was not one of them.  As a mother who worked full time and had to cook every night to make sure that our meals were completely gluten free, I was not prepared to spend my weekends cooking soup.  I mean, that would take forever.  Right?

Maybe not.  At first I began to cook big batches of soup on weekends and freeze them in meal sized portions to take out and thaw for weekday meals.  I still do this for more time consuming soups such as pea soup and the very labour intensive borscht that I make twice a year.  However, I now also make soup from scratch on a weekday after work.  From start to finish, it's ready in an hour.  Of that hour, most of the time is spent simmering on the stove while we do homework, tidy up or just relax.  In the fall and winter months, I make this soup about once a week.  It is fast and versatile - perfect for using up whatever veggies you have in the pantry or refrigerator.


Weekday Soup

1 cup diced onion
1 cup diced celery
2 tablespoons olive oil (or oil of your choice)
3 cloves minced garlic
2 cups diced carrot
6 cups stock or broth (chicken, veggie, beef, whatever you have around)
1 large can tomato sauce (the ones I use are about 2 and 1/2 cups)
1 cup frozen peas
1 teaspoon dried thyme
1 teaspoon dried oregano
salt and pepper to taste
Other add ins: 1 cup corn kernels, 1 or 2 cups shredded cabbage, 1 cup diced zucchini, 1 cup baby spinach leaves, etc.

Heat oil in a large pot over medium high heat.  Add in celery, onions and carrots.  Stir every minute or so.  Once the onions are cooked, add in garlic.  Cook for one minute.  Add in broth, tomato sauce, oregano and thyme.  Cover.  Reduce heat to low and allow to simmer for 20 minutes or until carrots are almost cooked.  Add frozen peas and any other add ins you like.  Bring to a simmer again.  Allow to cook for five to ten minutes or until the peas and add ins are cooked to your liking.  Add salt and pepper to taste.

I have also thrown everything in the slow cooker and allowed it to cook for ten hours on low while I was at work, and it turned out very well.  Something else we do is throw in a pound of lean ground beef with the onions, celery and carrots.  Make sure it is cooked through before adding the next ingredients.

At our house, we always eat these with grilled cheese on rye bread for the adults or gluten free bread for our older daughter.  A great and simple dinner on a chilly fall evening!

Shared on:

Hun...What's For Dinner, Sweet Haute, Fireflies and Jellybeans, Two Yellow Birds Decor, Gingerly Made

Thursday, September 19, 2013

Experimenting with Almond Milk


I love almond milk.  The love affair began when my youngest daughter was unable to tolerate dairy for a year or so while her body repaired itself after a diagnosis of Celiac Disease.  Of all of the non-dairy milks we tried, unsweetened vanilla almond milk was by far our favourite.  She can tolerate dairy now, but for the most part we haven't gone back.  We generally avoid dairy in our home - I just don't think it's all that great for us.  But almond milk...that's a different story.

Whenever it went on sale, I would stock up on my favourite brand.  I still have at least five cartons in the pantry.  Then I started hearing about this thing called carrageenan.  I've heard whisperings about it for years, and mostly didn't listen.  But now more and more people are questioning the safety of this food ingredient found in many non-dairy milks to help the texture become closer to that of cow's milk.  As a precaution, I do my best to avoid products with carrageenan as best I can.

In my corner of the country, none of the brands of almond milk in stores are without carrageenan.  I have still been drinking up my stash of almond milk cartons, but a little more slowly.  And I've been keeping this recipe in the back of my mind for a rainy day.  I decided to take the plunge yesterday after buying a huge bag of raw almonds at the bulk food store.

I have to say, it was so much easier than I had anticipated!  I did not have a nut milk bag, but I used a jelly bag that I had bought to make crabapple jelly last summer and it worked perfectly.  The hardest part of making my own almond milk was to remember to soak the almonds overnight.  I forgot three days in a row.  I remembered once while laying in bed and was just too lazy to get up, so it got pushed to the next day.  Again.  Once the almonds were soaked, the rest of the recipe literally took five minutes.  I used pure vanilla extract, and this was my result:


You can see all of the delicious flecks of cinnamon slowly settling to the bottom of the jar.  This stuff is good.  Really good.  But - I don't really know that I'll make it often.  Here's why:  I don't eat cereal often, and I don't drink my almond milk on it's own.  I consume most of my almond milk in coffee.  About 1/3 of a cup per mug of coffee.  When I tried to use my homemade version in my coffee, it separated.  It looked gross.  I could stir it back together, but within 20 seconds it was separating again.  Not fun.  Maybe that's what the carrageenan does?  Next time I'm on a cereal or smoothie kick I will make this, but not for everyday coffee consumption.

If you drink your almond milk by the glass, in cereal or a smoothie, I definitely recommend this recipe.  It is so simple and fast.  As for me, I'm still on the hunt for something to add to my coffee.